티스토리 뷰
지난 글에 이어서 SwiftUI에서 Map을 다루어 보려고 한다.
지난 글: SwiftUI - MapKit 사용하기
Map에는 MapMarker와 MapAnnotation, MapPin을 사용해 마커를 표시할 수 있는데,
두 방식 중 MapPin은 Deprecated되어 MapMarker나 MapAnnotation의 사용을 권장한다.
MapMarker
MapMarker.init(coordinate: CLLocationCoordinate2D, tint: Color?)MapMarker는 마커의 위치를 나타내는 coordinate: CLLocationCoordinate2D와 마커의 색상을 결정짓는 tint: Color?의 옵션을 받는다.
이 MapMarker를 Map의 annotationContent에서 생성하면 되는데, 우선 annotationItems에 생성할 마커의 정보를 담은 데이터를 전달해줘야 한다.
Annotation Item
struct Place : Identifiable {
    var id: UUID = UUID()
    var location: CLLocationCoordinate2D
    var color: Color
}
간단하게 마커를 띄울 장소에 대한 객체를 만들었다.
annotationItems는 ForEach와 마찬가지로 RandomAccessCollection을 받아야 하기 때문에 Identifiable을 구현해줘야 한다.
MapMarker 표시하기
다음으로, 마커를 표시하는 것은 간단하다.
Annotation Item을 선언해주고, Map의 Annotation Content에 MapMarker를 생성해주면 된다.
struct ContentView: View {
    // 지도 중심점
    @State private var region = MKCoordinateRegion(
        center: CLLocationCoordinate2D(latitude: 37.88371, longitude: 127.73947),
        span: MKCoordinateSpan(latitudeDelta: 0.002, longitudeDelta: 0.002)
    )
    // 마커를 표시할 장소들
    @State private var places = [
        Place(
            location: CLLocationCoordinate2D(latitude: 37.88371, longitude: 127.73947),
            color: Color.blue
        )
    ]

    var body: some View {
    	// 지도
        // annotationItems에 마커를 표시할 장소들을 넣어준다.
        Map(coordinateRegion: $region, annotationItems: places) { item in
            // 마커 생성
            // item: Place
            // 장소에서 location과 Color 정보를 가져와서 생성한다.
            MapMarker(coordinate: item.location, tint: item.color)
        }
    }
}
전체 소스
import SwiftUI
import MapKit

struct Place : Identifiable {
    var id: UUID = UUID()
    var location: CLLocationCoordinate2D
    var color: Color
}

struct ContentView: View {

    @State private var region = MKCoordinateRegion(
        center: CLLocationCoordinate2D(latitude: 37.88371, longitude: 127.73947),
        span: MKCoordinateSpan(latitudeDelta: 0.002, longitudeDelta: 0.002)
    )
    @State private var places = [
        Place(
            location: CLLocationCoordinate2D(latitude: 37.88371, longitude: 127.73947),
            color: Color.blue
        )
    ]

    var body: some View {
        Map(coordinateRegion: $region, annotationItems: places) { item in
            MapMarker(coordinate: item.location, tint: item.color)
        }
    }
}
MapAnnotation
MapMarker는 기본적으로 풍선 형태의 어노테이션만을 표시한다.
만약 마커의 모양을 원하는대로 만들고 싶다면, MapAnnotation을 활용해 만들어야 한다.
MapAnnotation.init(coordinate: CLLocationCoordinate2D, anchorPoint: CGPoint, content: () -> View))MapMarker와 크게 다를 것은 없다.
coordinate: CLLocationCoordinate2D에 마커를 표시할 좌표를 넣어주고, content에 마커의 모양을 정의해주면 된다.
하나 특이한 것은, anchorPoint: CGPoint가 있어서 MapAnnotation이 나타날 위치를 어느정도 조정해줄 수 있다.
우선 앞서 만들었던 Place를 약간 손봐서 이름을 표시할 수 있도록 수정한다.
Place 수정
struct Place : Identifiable {
    var id: UUID = UUID()
    var name: String
    var location: CLLocationCoordinate2D
    var color: Color
}
name 속성을 추가했다.
마커를 표시할 장소 변수인 places도 이에 맞게 수정해준다.
@State private var places = [
    Place(
        name: "장소 1",
        location: CLLocationCoordinate2D(latitude: 37.88371, longitude: 127.73947),
        color: Color.blue
    )
]
MapAnnotation
이후 MapMarker와 마찬가지로 Map의 annotationContent에 MapAnnotation을 생성한다.
var body: some View {
Map(coordinateRegion: $region, annotationItems: places) { item in
MapAnnotation(coordinate: item.location) {
// 디자인은 더 예쁘게 만들 수 있을 것이다...
VStack {
Text(item.name)
Circle()
.stroke(item.color, lineWidth: 2)
.foregroundColor(item.color.opacity(0.3))
.frame(width: 26, height: 26)
}
}
}
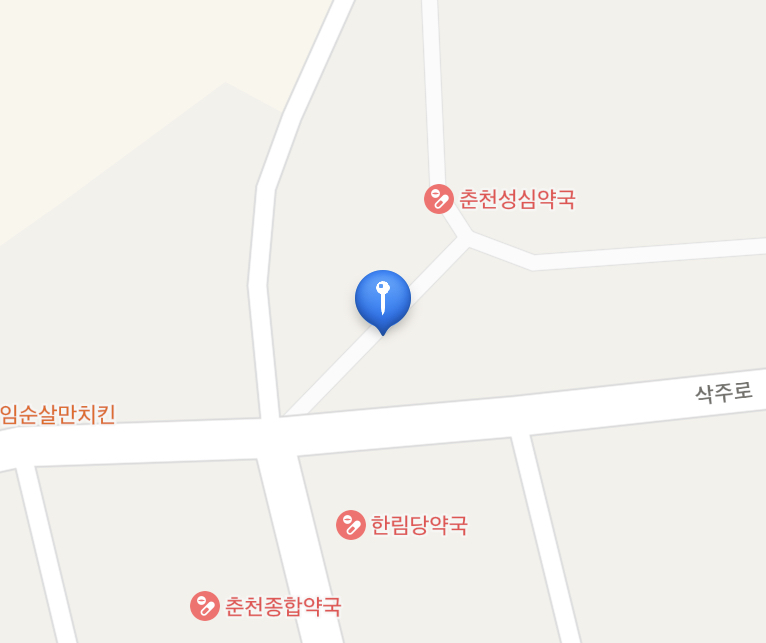
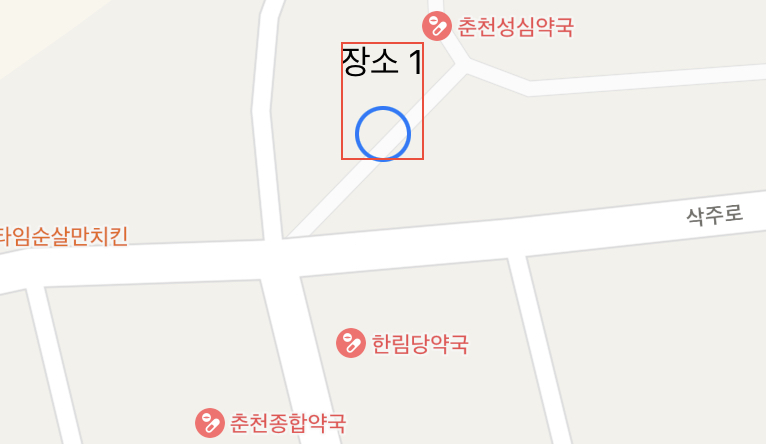
}이렇게 만들면 아래와 같이 MapAnnotation을 만들 수 있는데, 한 가지 문제가 있다.
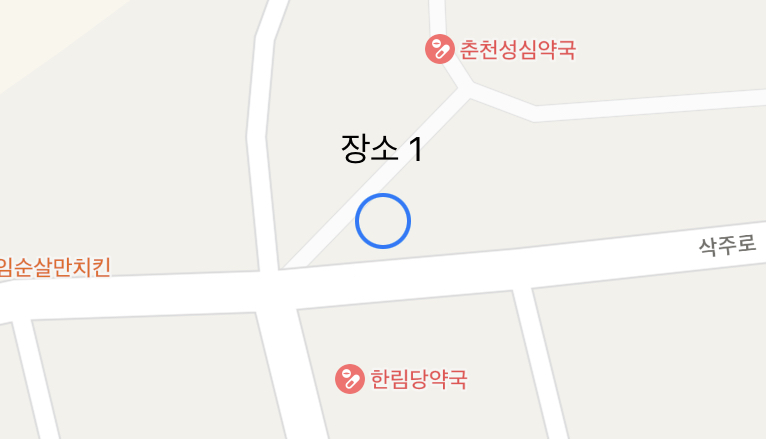

MapMarker를 사용해 나타낸 우측 사진과 비교하면, 위치가 정확하지 않은 것을 볼 수 있다.
이는 MapAnnotation을 생성했을 때, 좌표가 MapAnnotation의 중앙에 위치하기 때문에 발생하는 현상이다.

이 문제를 해결하려면, MapAnnotation의 anchorPoint 속성을 적절하게 설정해주면 된다.
var body: some View {
    Map(coordinateRegion: $region, annotationItems: places) { item in
        MapAnnotation(coordinate: item.location, anchorPoint: CGPoint(x: 0.5, y: 1)) {
            // 디자인은 더 나은 방식으로 만들 수 있을 것이다...
            VStack {
                Text(item.name)
                Circle()
                    .stroke(item.color, lineWidth: 2)
                    .foregroundColor(item.color.opacity(0.3))
                    .frame(width: 26, height: 26)
            }
        }
    }
}
위 코드에서 anchorPoint 속성을 CGPoint(x: 0.5, y: 1)로 설정해줬는데,
이렇게 함으로써 MapAnnotation의 x축 중앙, y축 하단이 좌표에 위치하도록 할 수 있다.
마커를 화살표 이미지로 만든 다음, 화살표의 끝 부분이 좌표에 오도록 할 때 유용한 속성인 것 같다.
전체 코드
import SwiftUI
import MapKit

struct Place : Identifiable {
    var id: UUID = UUID()
    var name: String
    var location: CLLocationCoordinate2D
    var color: Color
}

struct ContentView: View {

    @State private var region = MKCoordinateRegion(
        center: CLLocationCoordinate2D(latitude: 37.88371, longitude: 127.73947),
        span: MKCoordinateSpan(latitudeDelta: 0.002, longitudeDelta: 0.002)
    )
    @State private var places = [
        Place(
            name: "장소 1",
            location: CLLocationCoordinate2D(latitude: 37.88371, longitude: 127.73947),
            color: Color.blue
        )
    ]

    var body: some View {
        Map(coordinateRegion: $region, annotationItems: places) { item in
            MapAnnotation(coordinate: item.location, anchorPoint: CGPoint(x: 0.5, y: 1)) {
                VStack {
                    Text(item.name)
                    Circle()
                        .stroke(item.color, lineWidth: 2)
                        .foregroundColor(item.color.opacity(0.3))
                        .frame(width: 26, height: 26)
                }.border(Color.red, width: 1)
            }
        }
    }
}
마커 클릭
마커를 클릭했을 때 해당 위치에 대해 특정 작업을 하고 싶다면, onTapGesture를 사용해 클릭을 인식하도록 할 수 있다.
struct ContentView: View {

    @State private var region = MKCoordinateRegion(
        center: CLLocationCoordinate2D(latitude: 37.88371, longitude: 127.73947),
        span: MKCoordinateSpan(latitudeDelta: 0.002, longitudeDelta: 0.002)
    )
    @State private var places = [
        Place(
            name: "장소 1",
            location: CLLocationCoordinate2D(latitude: 37.88371, longitude: 127.73947),
            color: Color.blue
        ),
        Place(
            name: "장소 2",
            location: CLLocationCoordinate2D(latitude: 37.88423, longitude: 127.73974),
            color: Color.blue
        ),
    ]
    @State private var selectedPlace: Place?

    var body: some View {
        ZStack {
            Map(coordinateRegion: $region, annotationItems: places) { item in
                MapAnnotation(coordinate: item.location, anchorPoint: CGPoint(x: 0.5, y: 1)) {
                    VStack {
                        Text(item.name)
                        Circle()
                            .stroke(item.color, lineWidth: 2)
                            .foregroundColor(item.color.opacity(0.3))
                            .frame(width: 26, height: 26)
                    }
                    .onTapGesture {
                        selectedPlace = item
                    }
                }
            }
        }
    }
}
이 방법은 MapAnnotation만 가능하다.
'iOS > SwiftUI' 카테고리의 다른 글
| SwiftUI - MapKit 사용하기 (0) | 2023.02.13 |
|---|---|
| SwiftUI - Multi Component PickerView (0) | 2023.02.10 |
| SwiftUI - 글자수만큼 분리된 TextField 만들기 (0) | 2023.02.07 |